Editing appearances inside Onshape just go better. Now applying custom color to any region or face is a snap! Gone are the days of needing a workaround to simply change the face color of solid or surface faces of part-studio geometry. It looks like my old “zero offset surface copy” workaround has been rendered obsolete. Another notable enhancement in the June 3rd CAD Improvements update is the addition of the Appearance Panel which allows for better management of color and the ability to use color to browse the feature tree. Additionally, colors can now be configured in the same manner as other features within the part-studio. Let’s have a look at all this update has to offer.
What’s New in Onshape’s Latest Update (June 3rd, 2020)
Custom Appearance Scenarios
There are several key scenarios that benefit from the new face color enhancements. Consider the following list:
- Distinguish different part materials or finishes
- Indicate face regions of a part that require special treatment such as paint, lubrication, or adhesive applied.
- Preparing a model for export to 3rd party rendering application.
Assigning Face Colors
The workflow for assigning a color to an entire part or surface feature remains the same. Simply navigate to the browser tree, right-clicking over a part or surface of interest to bring up the context menu, which contains the “edit appearance” command.
Now for the magic! Select any face, especially those previously troublesome split face features. Bring up the context menu using the same right-click gesture. Located at the very bottom of the menu is the new “edit face appearance” command. A left click will bring up the appearance editor and enable you to mix and assign custom colors to your heart’s delight!

Editing Assigned Face Colors
An all-new Appearance Panel has been added to the UI and is grouped with the configuration and custom tables panels at the right of the display area. A click of the appearance icon presents a collection of new commands to manage part-studio appearances.
Note: The Appearance Panel will not be available until the first part or surface feature is created.
The new appearance panel is a one-stop location for adjusting everything associated with a part studios appearance. We’re talking quantity of faces selected, unique naming, and individual face colors. Another nugget of color customizing goodness to be had via the appearance panel is appearance configurations. This too is totally new functionality, yet employed with a familiar workflow. If you’ve dabbled at all with the configuration editor you should find configuring appearances a breeze.


Product Labels & Color
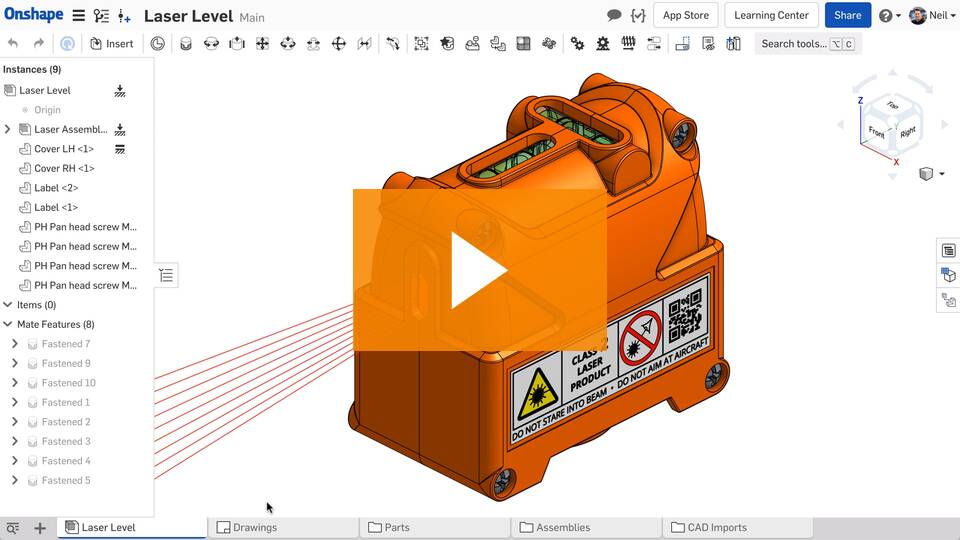
The CAD Improvement video contained an example of a colorized warning label. Although a workflow of how-to construct the label was not described, I’m surmising a .SVG file was used. In any case, having access to the new tools within the appearance editor to quickly swap out color should make working with custom labels more manageable.

Color & Imported Parts
A word on imported file behavior. Imported parts containing custom face color schemes will display correctly. However, at present the colors will not auto-populate within the appearance panel. Each color can be overridden or added to the appearance pallet as desired.
Note: All import file formats support face colors, however only Parasolid based file formats retain face split features and their subsequent assigned colors.
Derived parts behave in the same manner as imported geometry with respect to color modification. While overriding a color is possible, to achieve a color change that is persistent, the color edit must take place within the derived part file.

Kudos to the Onshape development team for delivering an appearance tool upgrade that is spot-on! I’m excited to build new and/or revisit some of my existing models to give a go at laying down some fresh colors!


![6 Types of Civil Engineering Drawings [Detailed Guide]](https://www.solidsmack.com/wp-content/uploads/2023/12/Civil-Engineering-Drawings-270x180.jpeg)
