There are lots of lamps out there that you can buy to instantly light up your room. But sometimes, with the plethora of designs available, finding something that will match your taste can be hard. And if you have a wood-themed or minimalist room at home, you might want to consider a lamp that will complement it. But instead of spending a lot on a lamp, why not try to make one? The YouTube channel Totally Handy can help you with that.
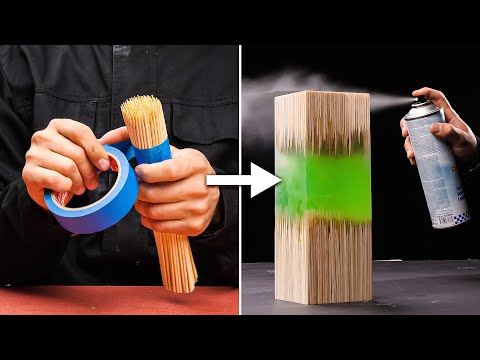
You’ll need a bunch of wooden skewers, epoxy resin, some plastic, and a couple of LEDs to make this nifty lamp. Once you have everything needed, start by chopping those skewers in half. After that, proceed to the creation of mold which is one of the biggest requirements in any resin project.

Making a Mold
You’ll want a rectangular mold with a recess on one side to hold the power source. The easiest way to make this is by measuring out and gluing plastic panels together.

Placing the Skewers
This makeshift container will allow you to arrange skewers on both sides. Make sure the skewers are densely packed, so both sides would look like solid pieces of wood. After setting them down, you need to secure the bundle of sticks to prevent them from moving. You can do this by gluing plastic panels on both sides.

Filling In the Space With LEDs
To fill in the unsightly gap between the skewers, cut your LEDs from your power source (don’t worry, you’ll be fixing that later) and use them to fill in the remaining space. You’ll want to drill a hole after this. This will allow you to pass the LED strips from the center to the recess which holds your power source. Since you’ll be filling the mold with resin later, make sure to seal off the hole and let it dry before moving on to the next step.

It’s Resin Time!
After much preparation, it’s finally time to add the resin. Totally Handy used a green pigment for their resin, but you can choose whichever color you want for your lamp.
Make sure to drill a hole on the top of your mold to allow air to rise to the surface. Once it’s dry, carefully heat the glue and peel the plastic off of your mold.

Sanding & Polishing
To make the lamp shape uniform on all sides, take it to a belt sander and shape it down. Totally Handy also used Cyanoacrylate (CA) glue and glue activator to help keep the parts intact while performing the heavy sanding process.
The sanding process will make your lamp look quite dull and opaque, so make sure to buffer and polish it to bring back some of its transparency.

Reconnecting the LEDs
Finally, you can solder the lamp LEDs back to their power source. While Totally Handy made use of a battery pack for their lamp, you can connect these lights to a traditional plug and get the same results.

If you buffered and polished the lamp correctly, the LEDs should shine through and illuminate the room with your chosen resin’s color.
The sad thing about encasing LEDs in resin, however, is that the lights will eventually lose their power and burn out. There’s no way to replace them without cutting open the lamp to pull them out manually. But while the lights are still good, this lamp will provide you with a cheap way to light up your office or room with an enchanting glow.