
As the title implies today we’ll delve into how to make realistic looking objects that can be used as film props or Cosplay accessories. And we’ll do it with the help of a new friend, The Crafsman! You’ll learn a few techniques for making molds and objects using two-part pourable silicone rubber. And after the last squishy part cures, you’ll be happy to know you could do the same without the worry of breaking the bank!
By now I’d imagine my more grammatically astute readers are wondering, “Did SkillCoach lay down a typo from the get-go in the title?” Nope! The C-R-A-F-S-M-A-N spelling is spot on! And, today marks the first Solidsmack post featuring a how-to video from The Crafsman SteadyCraftin YouTube channel. And I guarantee in watching it, you are in for a treat!
Meet The Crafsman

I stumbled across The Crafsman about nine months ago and immediately took a liking to his show. Crafsman is witty, creative, and caring. A quick peruse of his comments or a careful study of his story-lines, reveals that he manages his 166k+ subscribers with a spirit of diplomacy. In short, Crafsman promotes the Golden Rule.
His style is unassuming, so much so that he’s left his identity a mystery and shrouded with intrigue. A puppet and a colorful array of gloves conceal his identity as he works his magic each and every episode.

I especially enjoy Crafsman’s show intro, it resonates with me. Perhaps owing to a hint of R&B undertones mingled with Southern hospitality. I find myself quoting his opening lines randomly throughout the day! It’s novel and catchy. Least that’s what I think. Now, my wife, she says “It don’t make no sense!? But I’ll let you be the judge. It goes something like this………..

“Hello and welcome to the Crafsman show. My name is yo host…. the Crafsman!“
Again, even in his intro Crafsman is aiming for anonymity. I’m good with that. Over and above all the whim and improvisation infused in each show, what comes through clearly to me is that Crafsman has got depth and breadth of skill. Best of all, Crafsman is willing and eager to share all he learns. His pace of teaching is manageable and he even shares his process flubbers. Now you can’t beat that with a stick! So let’s dig in and see what we can learn about making squishy realistic looking props from the Crafsman. Ready, set, action!
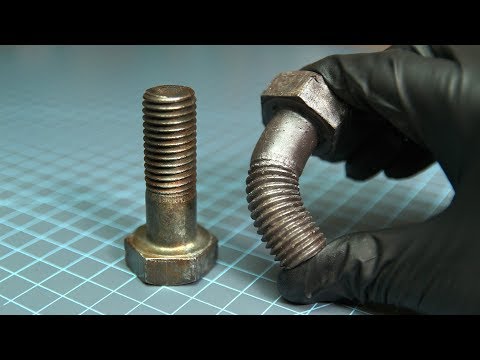
Squishy Metal Props | Process Highlights!

So here’s the question. Why squishy rubber? Well, have you ever been smote upside the head by a galvanized pipe attempting to elude an arch nemesis while filming an action scene for a low budget movie? Probably not. But one of Crafsman’s young subscribers was and that was enough to prompt a project to figure out how to produce safe, realistic props!

Material Selection
A quick online search will show that there are a number of mold making materials to choose from. In this video, Crafsman went with two of his old standby products manufactured by Smooth-On, Mold Star™ 15-Slow and Dragon Skin™ 10 FAST. Both are measured by an equal proportion, cure at room temperature, and do not necessarily need to be degassed. Although Crafsman did have some Simpact™ 85A silicone on hand he did not offer commentary on why he chose using Dragon Skin over it. Perhaps viewing one of his earlier videos will shed some light on that. He did mention its important to be thrifty and do our best to make use of what we have. Crafsman poured a tested part to check the quality of the mold. For this, he used Smooth‑Cast™ 65D a rigid material.


Making The Mold
As shown mold construction does not have to be elaborate. The key is finding a cup or donor container roughly the size of your object.


Casting Test Part + Exploring Finishes
It’s always wise to do several test pours that way you know how the mold is behaving. you’ll learn things such as if the mold is trapping air, or how much material to mix.


Silicone To Silicone Molding Process


Techniques For Repairing Missing Details


Well, Crafsman came through again with a nice step-by-step how-to. In preparing this post I watched and listened carefully to his video multiple times. With each viewing, I gleaned something new and got a few more hearty chuckles to-boot!
So, to wrap up this post I leave you the words of Crafsman himself … “You all be blessed and keep steady craftin!”


