")
Jupiter Ascending by the Wachowski siblings opened this weekend. After seeing the original trailer, I was struck by the hovering, glowing cool factor of the boots for “Caine” (played by Channing Tatum). Hmmm, LEDs on the bottom of the sole. And there lying in the corner of my shop, an old pair of my boots. It went boots, Tatum, boots, Tatum, boots, Tatum, boots… for a while, until I realized… dur… I can make THAT!
The easiest way was to handle this project was to call upon one of my older projects, The Starlight Paintball. In that project, I took the LED Throwie idea, and put them inside paintballs. Measuring the sole of my boots, the thinnest section I had to work with was 0.6 inches–almost exactly the size of your standard paintball at 0.68 inches in diameter.

Caine flying through the street in his boots with Jupiter on his back from the Jupiter Ascending trailer. This is the lighting effect I set out to make.
It occurred to me, this is my first attempt at cosplay, in a way. But for the record, authentic accuracy is not central to my build. Instead, I wanted to get the lighting effect on shoes that could you could wear everyday. As many said while I was building this project, “Oh, it’s like how little kids have lights in their shoes.” I replied, “No way punk, these are on the BOTTOM, subtle!”
See! Let me show you how to make your own!
MATERIALS
How to Make Jupiter Ascending – Caine’s light up boots:
- 32-34 3mm blue LEDs (Any mix of colors)*
- 32-34 1/2″ diameter polycarbonate plastic discs (But from a 1′ row of raw extrusion)
- 32-34 CR1225 batteries
- 32-34 segments of 3/8” Heat Shrink Tube Cut to a Length of ½”
- Tape for insulating one lead of the LEDs
- Old Boots (I used my trusty old CORCORAN JUMP BOOTS, 10 INCH LEATHER, SIDE ZIPPER with LIGHT WEIGHT SOLE)
Tools:
- Torch or Heat Gun
- Scissors and Pliers
- Power drill with a small pilot drill bit (anything smaller than 1/2″) and a 1/2″ drill bit
- Lathe
*Note that the average price is around $0.50 to $0.75 USD per light.
STEPS
Step 1: Mark Light Locations
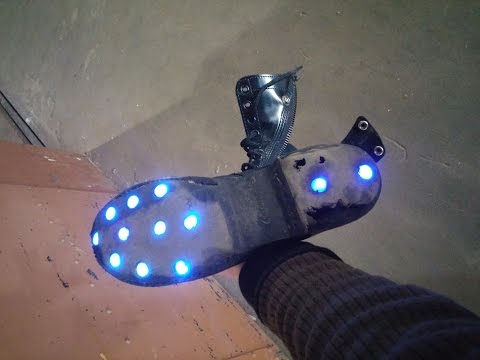
Take your boots and locate where you want to place the lights. (For this, I tried to copy the layout of Caine’s lights from Jupiter Ascending.)

Step 2: Drill Holes
I drilled a pilot hole of 1/4″ at each spot, then followed with a 1/2″ drill bit. Drilling the pilot hole prevents the larger drill bit from “walking” (when the drill bit moves away from the desired spot across the surface of the material).

These Corcoran Side Zip boots were ideal for this project, since the sole was flat and smooth. I bought those originally, since they last longer than one with a waffle.

All holes drilled. Take a look at the heels. The rubber was far too damaged to get the four side lights on each. A shame I was not 100% accurate.
Step 3: Add the Plastic Cover
Cut the Polycarbonate discs on your lathe. I made a variety of thicknesses, figuring different holes would require pieces of different thickness and the boot sole is so old the rubber was deteriorating. Drilling them didn’t help the integrity.
Step 4: Assemble the LEDs
This is very much like the old Starlight Paintball project, except for one step. The LED needs to be positioned on top of one side of the battery. The 3mm LEDs I selected have the best vertical light output. There are others types with a broader light spread, but I didn’t want to wait a month to get them. The LEDs assembly is as follows:

Place LED on battery. I bend leads so there is more area of electrical contact.

Cut pieces of heat shrink tube for each LED

Cover and shrink’em!

I placed tape on one LED lead so it would not make contact with two sides of the battery when I bend it vertical. Bend LED to the top of battery and point upward. Admire! These are ready to be added to the shoe.
Step 5: Insert LEDs
The easy part. Stuff the LEDs inside the 1/2″ holes you drilled in the boot, then place the plastic plugs over the LEDs.

LED stuffed in one hole… looks weak… just wait.

Placing the polycarbonate disc over the LED straightens out the fugly.

Fresh!
Step 6: Zip/lace up kicks

Word.
RESULTS
- I was surprised how cool it was to have ground effects on my feet. Think about it. You stand there, no light shows… when you walk, you are lighting up the scene like Billy Jean.
- On camera, I achieved the Jupiter Ascending hover shoes effect quite well.
- I needed a spring clamp on each LED assembly. They would have intermittent connections on some of the spots. Putting my full weight on the shoes and jumping around didn’t help.
- After a while of jumping around and such, some of the thinner discs I cut popped out. Parts of the rubber flaked off too. Perhaps a better shoe is in order?
- This effect would be perfect for the club. Talk about a conversation starter.
NEXT LEVEL S**T:
- Jupiter Ascending Caine cosplay might be a cool use for this project, but I think it has further potential. Light color changing and flashing effects are in order.
- I plan to make each LED/Disc an enclosed plug. You would just pop them in as needed. That is, if your shoes and holes in them. (Clogs are banned from this. You heard me right! No Clogs!)
- I really don’t want to wire a network of light in the shoe, so I’m sticking with individual power sourcing. (They last 1 month solid before dimming!) The light changing/flashing effect will require wireless communication. That might be tough with one CR1225.


